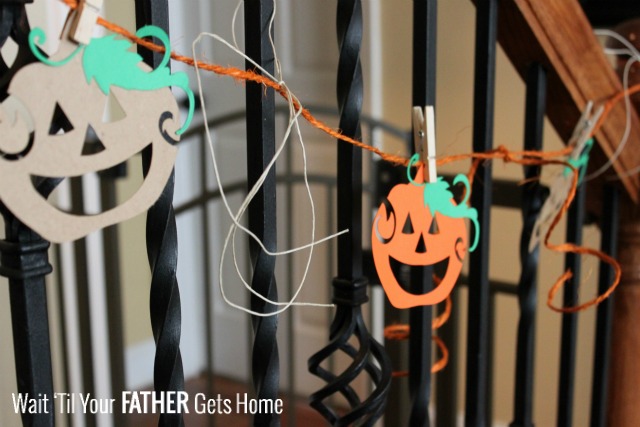
{upcycled bottle decor}

{upcycled bottle decor}

This is one of my very first posts from the beginning of Wait Til Your Father Gets Home.  I wanted to revisit it with all of my current readers as it’s one of my all time favorite projects, and I think it’s just such a great way to decorate around your home!

Enjoy!

Before I lose you, I’m not talking about displaying all the beer you’ve ever had on top of your kitchen cabinets like so many of my friends did in college.  Although it might have been considered really cool back then, times have changed.  We’ve traded in our beer bottles for baby bottles most days. Recently, we had some beer in the house that came in bottles that were kind of short and stubby.  I thought they were really cute and requested my husband drink them over the weekend so I could use them in a project.  He thought I was crazy, but luckily obliged!

To make Upcycled Bottles, you’ll need:

empty bottles {beer, wine, spaghetti sauce, pickles…possibilities are endless}
jute twine {purchased at Hobby Lobby}
hot glue gun/glue

Upcycled Bottle Decor @ Wait Til Your Father Gets Home these #twine wrapped bottles make the perfect decor item in your home for any season #bottles #DIY #upcycle #jute

Basically I started at the bottom of each bottle and tightly wrapped the jute twine around the bottle.  I put a skinny line of hot glue to secure the jute twine down.  I used a mini glue gun on this project and probably used about 4 sticks on each bottle.  That may sound like a lot of glue, but they are small sticks, and I have a huge pack of them, so I didn’t mind.  You could probably just secure the jute twine with a small dot of glue every so often if your glue supply is low.

Pretty soon I had three cute little wrapped bottles.  To add some color to them, I cut a green floral stem that I had leftover from my wreath project and gave them all a new home on our kitchen table.

Upcycled Bottle Decor @ Wait Til Your Father Gets Home these #twine wrapped bottles make the perfect decor item in your home for any season #bottles #DIY #upcycle #jute

These three bottles consistently find their way into my decor each season {a lot of times as part of my mantel decor}.  I love how versatile they are and that I can make them look so different by just adding a few new elements to them with each season.

You may have seen them in my…

 Spring Mantel

vases

Fall Mantel

full shot

Valentine’s Day Mantel

Valentine's Day Bunting

I’m going to be “redecorating” around the house again over the next few weeks, and I’ll be sure to update you then on where the bottles end up.  I’m going to try for a new location this time around!

Upcycled Bottle Decor @ Wait Til Your Father Gets Home these #twine wrapped bottles make the perfect decor item in your home for any season #bottles #DIY #upcycle #jute

Have you done any projects lately that cost next to nothing?

Do you have an obsession with wrapping items around your house in jute twine?

Are there any other older projects of mine that you’d like me to revisit with you all again?

wtyfgh-signature

I’ll be linking up at these parties!

About Meredith Hazel

Meredith is a stay at home mom and has been blogging since 2012. She started Wait 'Til Your Father Gets Home as a creative outlet in between nap times for her little one. Wait 'Til Your Father gets home is a combination of crafting tutorials, DIY projects, recipes and, sharing some of life's journey along the way.

{Simple Mason Jar Candles}

{Simple Mason Jar Candles}

Before I share today’s tutorial, I wanted to make sure you’ve entered to win one of two $175 gift cards to celebrate Wait ‘Til Your Father Gets Home & Chase the Star’s Blogiversaries this week!  You could win $175 to Target or Amazon just by entering here.  GOOD LUCK to all of you!

Blogiversary Banner

A few weeks ago I shared my Seductive Tables for Two tablescape, inspired by Moll Anderson’s new book.  Since then, I’ve had an overwhelming response about a small element of the post.

Everyone {including myself} seems to be in love with the mini mason jar candles I created.

Well, let me tell you, those things are super easy to make, and I loved them so much that they’re actually still out on the table.

Moss, Cork, and Mason Jar Candles @ WTYFGH

Simple Mason Jar Candle

Supplies needed:

small mason jars

Spanish moss

wine corks {get drinking, just kidding…not really}

tea lights

materials

To assemble the candles, stuff some Spanish moss in each mason jar and smash it down with your fingers.

Moss

You’ll want it to cover the bottom third or so of the jar.  Next, arrange the wine corks, vertically in the middle of the mason jar.  The diameter of my mason jars allowed for five corks.  Make sure they are as level as possible so you have a nice, flat surface for your tea lights.

corks

Once you feel that the corks are in place and the surface is flat enough, add the tea light on top.  And voila!  You’ve got a simple mason jar candle of your own.

candle

I’ve got a bit of an obsession with Spanish moss lately.  It must just be the time of year…who knows though!

Mason Jar Candle Holder

It just makes everything seem a little more bright and cheerful to me.

Mason Jar Candle Holder2

What item are you obsessing over right now in your decor?  Burlap? Twine? Moss?  I’d love to know!

wtyfgh-signature

I’ll be linking up here.

*Remember, please don’t leave candles burning unattended people! 

About Meredith Hazel

Meredith is a stay at home mom and has been blogging since 2012. She started Wait 'Til Your Father Gets Home as a creative outlet in between nap times for her little one. Wait 'Til Your Father gets home is a combination of crafting tutorials, DIY projects, recipes and, sharing some of life's journey along the way.

{Easy Mod Podge Coasters}

{Easy Mod Podge Coasters}

I don’t know about you, but I’ve felt super busy lately.  I haven’t had time to sit down and work on long craft and sewing projects in a while.  No complaints here though…I like to feel busy.  This past weekend I did have a little down time to work on a super fast project that I’ve been meaning to do for quite some time now.  By no means can I claim this as my own idea as I’ve seen it done countless times on Pinterest and on a few friends’ blogs, but sometimes a girl just wants to find a project on Pinterest and put her own spin on it!  So, over the weekend I sat down for about half an hour and made

Easy Mod Podge Coasters

Easy Mod Podge Coasters Set

To make your own, you’ll need:

4 x 4 inch white glazed tiles {found at Home Depot for about $.14 a piece}

scrapbook paper in your desired colors/patterns

Mod Podge

Mod Podge brush

white felt

paper cutter

hot glue gun/glue sticks

materials

First, I cut out 4 x 4 inch squares from both my scrapbook papers and the white felt.  I opted to use the paper cutter for the paper so that I had nice, straight lines.  I simply cut the felt using my fabric scissors.

squares

Once the felt was cut, I hot glued each piece onto the underside of each tile, thus creating a smooth surface that’s safe to rub against your tabletop.

felt

To secure the scrapbook paper on top, I applied a thin layer of Mod Podge to the top of the tile, smoothed the paper down with a flat edge, and sealed the top of it with another coat of Mod Podge.  After about half an hour they were dry!

If you wanted to give these as a gift this Spring, you could tie a set of four up with some twine and add them to a gift basket with some freshly bottled lemonade.

Coasters by Wait Til Your Father Gets Home

The green and white polka dotted one is my favorite!

Easy Mod Podge Coasters

What have you created lately?!

wtyfgh-signature

I’ll be linking up here!

About Meredith Hazel

Meredith is a stay at home mom and has been blogging since 2012. She started Wait 'Til Your Father Gets Home as a creative outlet in between nap times for her little one. Wait 'Til Your Father gets home is a combination of crafting tutorials, DIY projects, recipes and, sharing some of life's journey along the way.

{Home Depot Do It Herself Program}

{Home Depot Do It Herself Program}

Raise your hand if the thought of entering a Home Depot without your husband makes you a little nervous…up until this past week, I definitely would have my hand raised high.

Home Depot

You see, my husband is seriously the handiest person I know.  He’s demoed walls in our house, built a deck from scratch, painted every wall, fixed appliances…you name it…he’s done it.  I guess that’s why I never really even bothered to learn how to do some of the simplest DIY projects around our house.  I knew he’d just always take care of things.

But, look out world!  I attended my first ever Do It Herself Workshop at Home Depot in Cumberland, GA this past week, and this girl is ready to start tiling everything in sight {just kidding, but not really}.

DIH Workshop

DIH Event Signs

Our project was so super easy and extremely cute as it was a Pinterest inspired Mosaic Tile Mirror.  Granted, everything was pre-cut for all the attendees and the instructor and Home Depot employees helped anyone and everyone that needed it, but looking back on the process, I could totally take the skills I learned making my small mirror and applying it to a bigger project, perhaps some tile back splash in our laundry room or kitchen one day.

The set up was perfect, there was a station for each participant, chairs, refreshments, and fun supplies.

work stations

Am I the only one who thinks those orange Home Depot buckets are kinda cute?  I seriously could find so many uses for those things!

After choosing a spot, I laid out all of my supplies so I could start DIY’ing…

materials

To start, we sanded the edges of the mirror {the part that would eventually have the tile over it} so that the surface wasn’t so smooth.  Then we applied strips of a product called SimpleMat around the edge of the mirror.

Simple Mat

The top of the SimpleMat was slightly sticky, thus providing a surface for the glass mosaic tile sheets to stick to.

tiles

Once all the tile was in place, it was time to get down and dirty.  I put on the disposable gloves they provided and got to grouting.

grout

I was definitely most intimidated by this step because I didn’t want to mess anything up.  After all, up until this point I simply had to stick things in place and this girl definitely knows how to use a sticker!

Grouting was a piece of cake and actually fun.  I’m sure on a much larger scale, I might not refer to grouting as “fun”, but in this case…yep, it totally was!

clean

Once every little nook and cranny had grout, it was time to start washing away the excess with the damp sponge.  Also, super easy.  At this point, I was feeling like a DIY pro.  Honestly, in less than an hour, I had a brand new Mosaic Tile Mirror, made by ME!

Mosaic Tile Mirror

The instructors even sent us home with grout sealer to apply over the glass tile border after two days or so…talk about awesome!

If you are looking for a fun “girl’s night out” event, I highly recommend hitting up your local Home Depot.  Their Do It Herself Workshops are offered at every location every third Thursday of the month.  Next month’s workshop is how to install a dimmer switch.

I think there are so many benefits of this “female friendly” environment, especially for beginners {like me} who may be a bit intimidated by the store with the big orange letters and the lumber section!  These DIH workshops are meant to help you.  They are so laid back and offer plenty of time for questions.

Enjoy & have fun DIY’ing all you Do It “Herselfers” out there!

wtyfgh-signature

This is a sponsored post written by me on behalf of The Home Depot Cumberland (Store 121).  All opinions are 100% my own.

About Meredith Hazel

Meredith is a stay at home mom and has been blogging since 2012. She started Wait 'Til Your Father Gets Home as a creative outlet in between nap times for her little one. Wait 'Til Your Father gets home is a combination of crafting tutorials, DIY projects, recipes and, sharing some of life's journey along the way.

{World Market OZ Pinspiration Makeover}

{World Market OZ Pinspiration Makeover}

Okay, Valentine’s Day is over, February is drawing to an end, bring it on…I’m so ready for Spring!  When I think of Spring, there are a few things that come to mind.  Green grass, Easter baskets, new sandals, Spring cleaning, and adding fresh new decor items around my house to brighten things up.  Don’t get me wrong, I get all giddy inside to decorate for the holidays and even for winter afterwards, but there is just something about Spring that puts a little spring in my step!  I love the bright colors and the new-ness of the entire season.

This year, I’m looking to add some bright colors to our home, and I’m so excited to take a trip to my local World Market store to find some Spring inspiration from their Victorian Isles Collection.  To keep some of the things that I’m lusting after organized, I even created a board on Pinterest, so I’d go into the shopping trip with some ideas in mind.

Some of the items I wold L.O.V.E. to purchase include…

collage

From the top, left to right: Blue Lila Wallpaper Memo BoardMulticolored Peony Bunches, Braided Rattan Brittany Baskets

Reversible Charlotte Lace Trim Placemats, Round Mossy Nest, Golden Nugget Basket Weave Jute Lumbar Throw Pillow

Luster Serving Bowls, Coral Royalty Stool, Mossy Basket

 After shopping at your local World Market {or online}, make sure to also enter to win in the

OZ The Great and Powerful Sweepstakes

presented by World Market

Win wondrous prizes and celebrate a world of adventure

Enter to win our grand prize package: private movie screening for you and 50 friends of OZ The Great and Powerful, FREE IMAX Movie Tickets for a year, $1,000 World Market gift card

Plus, 3 first prize winners receive $500 World Market gift cards

Enter online here.

Disney’s OZ The Great and Powerful is in Theaters March 8, 2013 and you can also experience it in IMAX 3D

Watch the movie trailer here.

Enjoy shopping this Spring {and GOOD LUCK in the Sweepstakes}!

wtyfgh-signature

You can stay connected with World Market and keep up to date with their latest trends, collections, and sales on Facebook, Twitter, Google+, or Pinterest.

“This shop is part of a social shopper marketing insight campaign with Pollinate Media Group™ and World Market, but all my opinions are my own. #pmedia #WorldMarket. http://cmp.ly/3/8vNxcO

Related Posts Plugin for WordPress, Blogger...

About Meredith Hazel

Meredith is a stay at home mom and has been blogging since 2012. She started Wait 'Til Your Father Gets Home as a creative outlet in between nap times for her little one. Wait 'Til Your Father gets home is a combination of crafting tutorials, DIY projects, recipes and, sharing some of life's journey along the way.