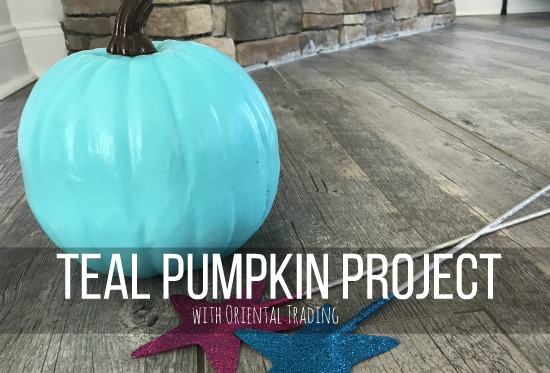
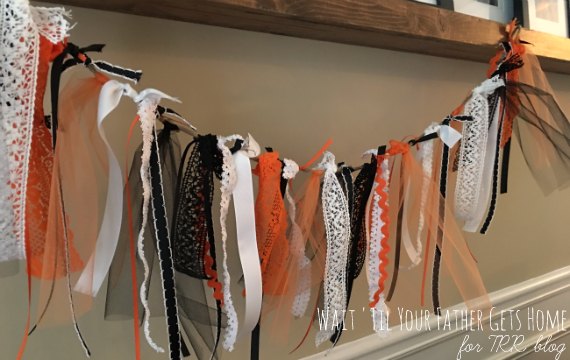
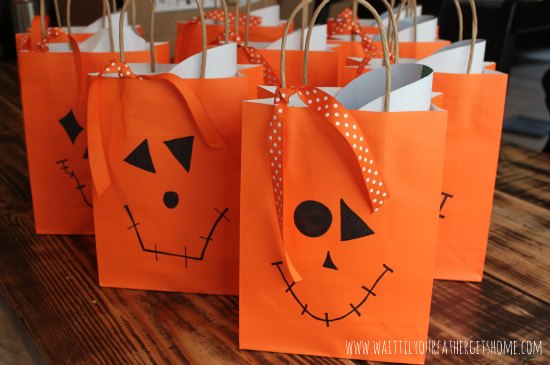
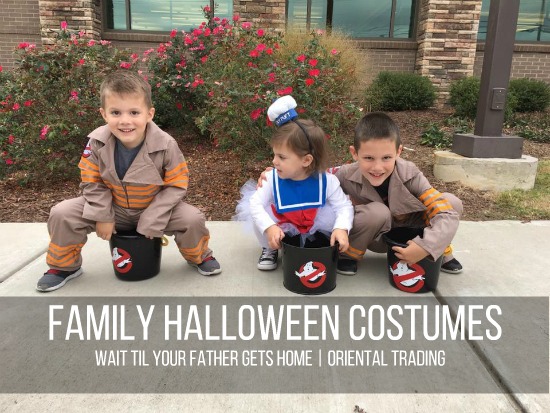
{Handmade Halloween Features}

{Handmade Halloween Features}

Oh wow!  We had some serious partying going on this month during the Handmade Halloween Party that I hosted with Adrianne & Kara!

Can you imagine if all of us crazy bloggers were able to get together and have one big Halloween Bash?  Or if we all lived in the same neighborhood to host a gigantic Trick-or-Treat party!?  Those kids would get the most creative Halloween candy and creations EVER!  {And we’d probably drive our poor husbands crazy with all of our collaborative projects}!

To celebrate Halloween today, I wanted to take a moment {or two} to feature some of my favorite projects, crafts, and recipes that were linked up this month!

In no particular order, they are…

Mummy Candy Bars by Artsy Fartsy Mama

Raven Inspired Halloween Porch by Create.Craft.Love

Halloween Mantel by 52 Mantels

Enter if You Dare Display by Sweet Boutique Home

Eyeball Bouquet by Crafts ‘n Coffee

No Sew Halloween Pennants by One Creative Mommy

Halloween Wreath by Sarah Dawn Desgins

Chalkboard Signs by A Night Owl

BOO Bowling Game by It’s Written on the Wall

If you’d like to pin any of these ideas, please visit the owner’s blog by clicking on the link above the photo! 

I hope you’ve enjoyed the features and the party this month!  Remember, all projects linked up will now be added to the Holiday Ideas menu located above my header!  You can look back to be inspired all year long!

Tomorrow I’ve got another holiday themed link party coming your way…think turkey! :)

Happy Halloween!

About Meredith Hazel

Meredith is a stay at home mom and has been blogging since 2012. She started Wait 'Til Your Father Gets Home as a creative outlet in between nap times for her little one. Wait 'Til Your Father gets home is a combination of crafting tutorials, DIY projects, recipes and, sharing some of life's journey along the way.

{Keep Calm & Link Up #10}

{Keep Calm & Link Up #10}

Welcome back to Keep Calm & Link Up!

Thanks so much to everyone that linked up last week!  We’re thrilled with the continued success of our party and feel honored that so many of you have been with us since the beginning.

The most viewed link belonged to Adrianne of Happy Hour Projects with her {DIY Pandora Bracelet Knockoff}.

We love this bracelet!  Who needs to spend $100s on a Pandora Bracelet when you could make this beaut?  So pretty!!

We each chose our favorite features as well.

Meredith loved the{Thrifty Earring Display} from Silver Boxes.

Stephanie simply added a coat of spray paint and turned this tray on it’s side to use as a pretty new earring display!

Barbara chose the {Repurposed Bathroom Mirror} by Pocket Full of Pink.

Can you believe this mirror has been in Karen’s bathroom for 10+ years!?  The transformation is awesome!

Sarah chose {The Halloween Countdown Magnet Frame} from Smart School House.

 Who isn’t excited for some serious trick-or-treating at the end of the month!?  This countdown is sure to be a hit with kids and grown ups alike!

Congrats to all those that were featured today!

If you want to be featured, make sure to include our button (found in my sidebar) or a text link!  There were so many links we wanted to feature but couldn’t since there wasn’t a link back to the party!

To keep up with features on Facebook during the week, please become a Facebook Fan of…

 Becoming Martha

 Chase the Star

 and Wait ‘Til Your Father Gets Home!

If you were featured today or on Facebook grab a featured button from my sidebar!

For even more FUN, all featured projects will be on our Keep Calm & Link Up Pinterest Board as well!

We also want to invite you to enter our birthday pillow giveaway from Applestone Drive going on at our weekly blog hop.  There are only a few days left to enter!

Good Luck!

And now, on to the party…


About Meredith Hazel

Meredith is a stay at home mom and has been blogging since 2012. She started Wait 'Til Your Father Gets Home as a creative outlet in between nap times for her little one. Wait 'Til Your Father gets home is a combination of crafting tutorials, DIY projects, recipes and, sharing some of life's journey along the way.

{Handmade Halloween Features & Guest Post}

{Handmade Halloween Features & Guest Post}

I”m sharing a guest post today over at Linky Here promoting the Handmade Halloween party with all of their readers.  In case you aren’t familiar with Linky Here, you must pay them a visit!  It’s a great resource to find the latest and greatest link parties available to bloggers!

Some fun projects that each of the co-hosts have shared so far this month at the Handmade Halloween Party include:

{Wood & Wine Cork Pumpkin} from Wait ‘Til Your Father Gets Home

{Mummy Action Figure} from Happy Hour Projects

{Little Pumpkin Crochet Pattern} from Petals to Picots

And some of my favorites linked up so far to the party this month are:

{Halloween Candy Bowl} from Create.Craft.Love

 {EEK! Witchy Jars} from Artsy Fartsy Mama 

{Halloween Witch Hat Banner} from Stubbornly Crafty

Please come join in on the Halloween fun this month!

We’d love to see all of your wonderful ideas at the Handmade Halloween Party!


About Meredith Hazel

Meredith is a stay at home mom and has been blogging since 2012. She started Wait 'Til Your Father Gets Home as a creative outlet in between nap times for her little one. Wait 'Til Your Father gets home is a combination of crafting tutorials, DIY projects, recipes and, sharing some of life's journey along the way.

{Halloween Table Runner}

{Halloween Table Runner}

I’m a big fan of a cute table runner, but definitely not paying the price for one.  While shopping a few weeks ago, I stumbled across some super cute Halloween-ish fabrics for 40% off at Jo Ann’s and knew they would be the perfect pieces for a cute table runner I had in mind.

To make a Halloween Table Runner, you’ll need:

three different Halloween fabrics (two for the front and one for the back) 1/2 yard of each

jumbo orange rick rack

orange thread

rotary cutter and cutting mat

iron

measuring tape

sewing machine

You’ll find that  a lot of table runners hang over the ends of each side of the table.  I’ve got a 15 month old, so that wasn’t an option for me.  I had visions of everything on top of the table runner crashing down on his little stubborn, oh so cute head, so I knew I wanted to stick to a size that fit in the middle of the table instead.

To get started, I ironed all three of my fabrics very well, after all, it’s always easier to work with nice, flat fabrics when cutting and sewing!

I then measured and cut the four strips for the top of the table runner.  Each strip measured about 4 1/2 x 41 inches.  I also measured and cut the fabric that would go on the back of the table runner to be about 16 x 41 inches.

To assemble the top of the table runner, pin two different fabric strips together, right sides facing each other and sew straight down the longest side.  Once sewn, repeat with the two remaining strips.

Finally, sew all four strips together, making sure that each fabric strip alternates.  As you can see, mine alternates between a skeleton fabric and an orange and black polka dot.  Iron this piece well, making sure that all folds are ironed in the same direction on the back side of the fabric.

Since I wanted to add some orange ric rac to the ends of the table runner, I pinned it in place and sewed it on before assembling the entire table runner.  This step was super easy, I just used the ric rac as a measurement and cut it where it met the ends of the fabric.  I sewed a straight line through the center of the ric rac and it stayed in place perfectly.

Now, to assemble the entire table runner, pin the fabric strip side to the solid piece that will serve as the back of the table runner, right sides together.  Sew 1/4 inch seam around the entire table runner and leave a 4 inch opening to turn it right side out.  Before turning, make sure to cut each corner at an angle so it doesn’t look all wonky!

Use a pencil or pen to poke the corners as far in as they’ll go, and run your iron over it one last time before closing that 4 inch hole and sewing a topstich around the entire table runner, using your presser foot as a guide.

Now, put your table runner on display with some of your favorite Halloween Decor or maybe even a big bowl of Halloween candy!

I’ll be linking up at these fantastic parties this week!

About Meredith Hazel

Meredith is a stay at home mom and has been blogging since 2012. She started Wait 'Til Your Father Gets Home as a creative outlet in between nap times for her little one. Wait 'Til Your Father gets home is a combination of crafting tutorials, DIY projects, recipes and, sharing some of life's journey along the way.

{Burlap Fall Banner & Mantel Reveal}

{Burlap Fall Banner & Mantel Reveal}

As mentioned before, burlap is the bomb!  I used it to make a banner for my son’s first birthday party, as a background for my Menu Planner Board, and most recently in my Ruffled Burlap Wreath for the Fall.

I knew I wanted to incorporate it into a fresh new banner for a Fall mantel I had in mind.  To make the banner you’ll need…

Burlap Fall Banner

4 pieces of burlap cut to the same size for F A L L

2 pieces of burlap cut to the same size for Fall embellishments

jute twine

Fall embellishments (leaves, a Fall stem, etc…)

black sharpie

glue gun/hot glue

surface to place under the burlap when you write

Now, if I had a fancy shmancy Silhouette I could have made a super cute banner, maybe using vinyl and some chalkboard paper, but me + Silhouette = no go (for now).  Luckily I’ve got some really nice, teacher handwriting.

I honestly just free-handed the letters, trying to make them look as centered and as even as possible.  I think I did a pretty good job considering.

For the end pieces, I hot glued a couple of leaves that I had in my Fall storage bin and a little wooden pumpkin to each piece of burlap.  I also pulled out a few strands of burlap on each piece, so they’d look a little tattered.

To attach the banner pieces to the jute twine, I didn’t do any measuring.  Who needs that extra step anyway?

I simply laid out the banner in front of my mantel, spaced things out how I felt I wanted them, and hot glued each burlap piece to the twine.  I wrapped the top of the burlap a bit so that it stuck well.

Once I had the banner hung (I just wrapped each end around the item on the mantel that was the furthest on each side), I then added leaves and pieces of a Fall floral stem where I thought it looked good.

Soon I had this beautiful

Burlap Fall Banner & Mantel

I LOVE the simplicity of it.

Those birds were actually from hubby’s grandparent’s house.  We get tons of compliments on them all the time.  I think they’re pretty cool!

I also added my jute twine wrapped beer bottles with some Fall stems I found in my storage bin, a $1.50 grapevine pumpkin from Target that I fancied up with an orange ribbon, our wine cork collection {we’ve been collecting for four years now}, and a vase filled with wine corks and a few Fall stems as well.  In fact, the only item I actually bought was the little grapevine pumpkin from Target.  So this mantel was totally refreshed by only spending $1.50…SCORE!

Are you on the burlap train with me?  Or are you over it?

What have you done with your mantel this Fall season?

Leave a comment or two, I’d love to hear your ideas!

I’ll be partying here all week!

Show & Tell Wednesday @ SNAP!


Photobucket

Related Posts Plugin for WordPress, Blogger...

About Meredith Hazel

Meredith is a stay at home mom and has been blogging since 2012. She started Wait 'Til Your Father Gets Home as a creative outlet in between nap times for her little one. Wait 'Til Your Father gets home is a combination of crafting tutorials, DIY projects, recipes and, sharing some of life's journey along the way.