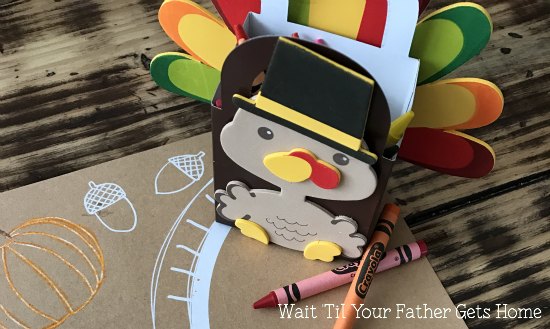
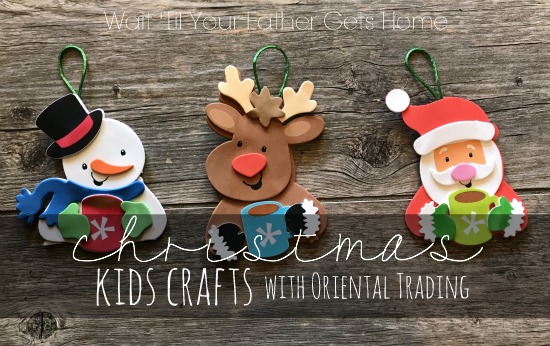
{No-Sew Burlap Table Runner}

{No-Sew Burlap Table Runner}

I went to Hobby Lobby yesterday, hoping to take advantage of the 80% off Thanksgiving and Fall decor sale they have right now.  I was super bummed to see that the one shelf that housed these items hardly had anything left!  Oh well, late to the party, I suppose.

I decided to head home (empty handed, yes…empty handed from a craft store trip….shocking, right?!) and looked through my crafting supplies.  There had to be a way to make some kind of table runner without my sewing machine (it’s still getting fixed).

I gathered the following supplies, plus my trusty glue gun, and got to work.

I don’t have exact measurements for the burlap and linen material I used as a liner.  I simply cut them until I felt they fit right with my table size!  I like to make table runners that don’t hang over the edges as a certain 16 month old would immediately try to pull it down.  All of the other supplies were leftover from my Fall Mantel and my Ruffled Burlap Wreath, both of which are still on display (until this weekend when I plan to start decorating for Christmas)!

I used a few dabs of hot glue on the corners and sides of the linen fabric to line the back of the burlap.  I figured that would eliminate some of the mess that comes with burlap and create a smoother surface on the bottom side.  The linen didn’t go all the way to the edges of the burlap as I wanted to pull a few strands off from each side to make the burlap fray.

Once the linen fabric was secured, I pulled a few strands of the burlap off of each side to create a frayed look.  I then added some Fall leaves and cute felt pumpkins (both originally found at Hobby Lobby) in two of the corners to give the table runner some color.  I used my hot glue gun to attach everything!

This is one of the easiest projects I’ve ever made!  The whole table runner took maybe 10 minutes after my glue gun heated up!  I love the simplicity of it and know it will be the perfect addition to our table at Thanksgiving dinner this Thursday!

Have a Happy & Blessed Thanksgiving tomorrow!  If you are looking to link up to Keep Calm & Link Up tomorrow evening, we will be partying, just a bit later than usual.  Stop by at 9 PM EST to link up this week!

I’ll be linking up at these fantastic parties.

About Meredith Hazel

Meredith is a stay at home mom and has been blogging since 2012. She started Wait 'Til Your Father Gets Home as a creative outlet in between nap times for her little one. Wait 'Til Your Father gets home is a combination of crafting tutorials, DIY projects, recipes and, sharing some of life's journey along the way.

{Thanksgiving Made Easy with Unilever}

{Thanksgiving Made Easy with Unilever}

Thanksgiving is one of my most favorite times of the year.  I love getting together with family and friends to celebrate all that we are thankful for, and I especially love to enjoy all of the delicious “Thanksgiving foods” that go along with that celebrating!

This season I’m planning to make several new dishes and of course some old favorites, all using a great Unilever spread, Country Crock.

A new dish I’m excited to make this year is

Sweet Potatoes Gratin

Prep Time: 30 minutes    Bake Time: 1 hour 30 minutes

Stand: 15 minutes    Oven: 325 degrees

2 T Country Crock, in small spoonfuls

Nonstick cooking spray

1 1/4 cup whipping cream

1 T Dijon mustard

1 t salt

1/2 t cumin

3 sweet potatoes, peeled and sliced 1/8 in. thick

1 cup grated Parmesan cheese

2 strips bacon, cooked crispy and crumbled (optional, but a good choice) 

Preheat the oven to 325 degrees and lightly coat a square baking dish with nonstick cooking spray.  In a medium bowl, whisk together the whipping cream, mustard, salt, and cumin.

Peel and slice the sweet potatoes.

Place the sliced potatoes in a mixing bowl and pour the cream mixture on top.  Stir the potatoes and the mixture to moisten the potatoes.

Arrange half of the potatoes in the prepared baking dish, overlapping slices slightly.  Sprinkle about half of the Parmesan over the potatoes.  Repeat layering the remaining potatoes in the dish, pour the left over cream from the bowl over the potatoes, and top with the remaining cheese.  Dot the top with the 2 tablespoons of Country Crock to give your dish some delicious taste!

Bake the sweet potatoes, uncovered, for 1 1/2 hours or until the potatoes are very tender and the sauce is noticeably thick and creamy.  Cover loosely with foil if top begins to brown too much!  Remove from oven, top with bacon, and let stand for 15 minutes before serving.  This recipe makes about 8 servings.

A second recipe I’m excited to make since I make at least one every year is…

Grandma’s Apple Pie

Prep Time: 30 minutes    Bake Time: 20 minutes; 25 minutes

Stand: 1 hour    Oven 400 degrees and 350 degrees

3 t Country Crock 

1 15 oz. package rolled, refrigerated pie crust

1/2 cup plus 1 t sugar

1/2 cup packed brown sugar

3 T cornstarch

1/4 t salt

1/2 t ground cinnamon

pinch ground cloves

4 pounds apples (get a variety)

2 t lemon juice

1 egg, beaten w/splash of water 

Heat oven to 400 degrees and unroll pie crust onto pie plate.  Prick the bottom with a fork and refrigerate.

Blend sugar, brown sugar, cornstarch, cinnamon, and cloves in a small bowl.  Peel apples and slice thin.

In a deep pan, melt the Country Crock, add apples, lemon juice, and sugar mixture.  Cook for 10 minutes on medium high heat to thicken the mixture on the apples.

Pour mixture into crust.

Unroll second crust, crimp edges together, and poke a design in the top (both for looks and to vent the pie while it bakes).

Brush the top of the pie with the egg mixture and sprinkle with the remaining teaspoon of sugar.  Bake at 400 degrees for 20 minutes then at 350 degrees for 25 minutes.  Cover the pie lightly with foil if it begins to brown too quickly!

Let the pie stand for at least 1 hour before slicing!

Enjoy!

Thank you to Good to Know & Unilever Spreads for being a sponsor. I was selected for this opportunity as a member of Clever Girls Collective. All opinions expressed here are my own.


About Meredith Hazel

Meredith is a stay at home mom and has been blogging since 2012. She started Wait 'Til Your Father Gets Home as a creative outlet in between nap times for her little one. Wait 'Til Your Father gets home is a combination of crafting tutorials, DIY projects, recipes and, sharing some of life's journey along the way.

{Thanksgiving Blocks Craft}

{Thanksgiving Blocks Craft}

Anyone else feeling like the time is absolutely flying by?!  I swear, before you know it, it’ll be Valentine’s Day!  In an attempt to try to s-l-o-w things down a bit, I sat down last weekend and finished up a cute Thanksgiving craft.  I’ve seen wooden blocks like this for every holiday out there, but wanted to put my own spin on it!

To make Thanksgiving Blocks, you’ll need:

3 pieces of scrap wood (all the same size-it’s up to you what size you prefer)

3 colors of acrylic paint (I went with Fall colors)

glitter in similar tones as your paint

Mod Podge

foam applicator brush

cute scrapbook sticker letters

Begin by painting each block a separate color.  I put two coats on each, but it will totally depend on the colors you choose.

Once each block has dried, apply a layer of Mod Podge, I used the Super Gloss variety, but just use whatever you have on hand!  Elmer’s school glue is great for glitter as well.  Sprinkle the glitter over the Mod Podge and let dry for at least an hour.

Once the glitter has dried, you can attach the scrapbook sticker letters on top of the glittered side of each block.  You can come up with any “Thanksgiving” related phrase or words.  I chose, “always give thanks”.  I can also switch it up when the mood strikes me to say “give thanks always”.

That’s it!  Super easy, right?!

I have the blocks set up in my kitchen next to one of my Mod Podge Dyed Mason Jars and some Fall stems, and it makes me smile every time I look at it!

I want to invite you to share any Thanksgiving related projects, recipes, or ideas at my Very Thankful Party until Friday, November 23rd!  I’d love to see how you’re celebrating this year!

Have a wonderful Wednesday!

I’ll be linking up at these great parties.

Visit thecsiproject.com

About Meredith Hazel

Meredith is a stay at home mom and has been blogging since 2012. She started Wait 'Til Your Father Gets Home as a creative outlet in between nap times for her little one. Wait 'Til Your Father gets home is a combination of crafting tutorials, DIY projects, recipes and, sharing some of life's journey along the way.

{Pilgrim Hat Cookies & a Virtual Thanksgiving Dinner}

{Pilgrim Hat Cookies & a Virtual Thanksgiving Dinner}

Have I got a treat for you today!

I’m excited to share that I’m teaming up with several fabulous bloggers to bring you a Virtual Thanksgiving Dinner, complete with recipe ideas, table decor, and desserts!  I seriously cannot wait to try out some of these awesome recipes this Thanksgiving.

My portion of the celebration is a dessert for the kiddos {or any adults that have a strong love for Reese’s Cups and Fudge Stripe Cookies}.

Not only are they super cute, they were so easy to make!  You could even save this as an after dinner create and eat project for the little ones you’re celebrating with!  They would love to get in on the action.

To make Pilgrim Hat Cookies, you’ll need:

white cookie frosting

Reese’s Peanut Butter Cups

Fudge Striped Cookies

To make each cookie, simply unwrap a Reese’s cup,

swirl some cookie icing around the center hole of the cookie {on the all chocolate side},

stick the Reese’s cup to the cookie,

add a circle of icing around the base of the Reese’s cup,

and a little rectangle to one side of the Reese’s cup for the buckle of the hat.

Simple as that!

Soon you’ll have an entire plate of little pilgrim hat cookies to enjoy with the little ones!

Check out the other courses at our virtual Thanksgiving Table today – some awesome blogs have every course covered!

Leaf Placecard Tutorial at One Artsy Mama
Cheeseball Appetizer at Create.Craft.Love (left)
and Hot Cheese Dip and Cracker Tray at Jessie Street Designs (right)
Tips For Cooking a Perfect Turkey at Ladybird Ln. (right)
and Slow Cooker Mashed Potatoes at Artsy Fartsy Mama (left)
Save oven space with Repeat Crafter Me’s Crock Pot Green Bean Casserole (left)
Cranberry Marshmallow Salad at Happy Hour Projects (center)
Cheddar Tea Biscuits at Becoming Martha (right)


Classic Warm Apple Crisp at Chase the Star (left)
Seven Alive’s Favorite Pumpkin Pie (right)


Turkey Cookies at Bear Rabbit Bear Crafts (left)
Pilgrim Hat Cookies at Wait Til Your Father Gets Home (right)

I hope you enjoyed this recipe round up, and you check out my friends’ favorites today too!  What’s your favorite Thanksgiving recipe?

Happy Thanksgiving everyone!

(and be SAFE on Black Friday if you’re brave enough to participate)!

I’ll be linking up at these fantastic parties!

About Meredith Hazel

Meredith is a stay at home mom and has been blogging since 2012. She started Wait 'Til Your Father Gets Home as a creative outlet in between nap times for her little one. Wait 'Til Your Father gets home is a combination of crafting tutorials, DIY projects, recipes and, sharing some of life's journey along the way.

{A Very Thankful Party}

{A Very Thankful Party}

Another new month, another new holiday to anticipate!

This month I’m teaming up with Kadie from Seven Alive, Morena from Morena’s Corner, and Adrianne of Happy Hour Projects to bring you…

The Very Thankful Party will run from November 1st-23rd (hello, Black Friday!).  We invite you to share all of your Thanksgiving related posts including recipes, crafts, and projects! As long as it has something to do with Thanksgiving or being thankful (and of course is family friendly) it’s fair game!

As usual, the party button is located in my sidebar.  It’s not a requirement to display it, but if you’d like to add it to your post, sidebar, or hall of fame party page…go for it!  The more participants in the party, the merrier!  Once you link up at one of the host blogs, your link is visible on all four blogs.  I’ll even add it to my Holiday Ideas menu after the party closes, so we can be inspired and thankful all year long.

We’re so excited to see what you’re working on this month to prepare for Thanksgiving!  As the mood strikes us, each of us will share some of our favorite features as well!

Happy linking & Happy Thanksgiving everyone!


Related Posts Plugin for WordPress, Blogger...

About Meredith Hazel

Meredith is a stay at home mom and has been blogging since 2012. She started Wait 'Til Your Father Gets Home as a creative outlet in between nap times for her little one. Wait 'Til Your Father gets home is a combination of crafting tutorials, DIY projects, recipes and, sharing some of life's journey along the way.