Wait Til Your Father Gets Home

Just a bit of all the little bits of life at home!

  • Home
    • About
      • Homeschool Necessities
      • Homeschool Books
      • Meet Meredith
      • Disclosure
      • Advertise
  • Podcast
    • Radical Podcast
  • Homeschool
    • Homeschool Organization
    • Book Lists
    • Sight Words
    • Curriculum
      • Preschool
      • Pre-K
      • Kindergarten
      • First Grade
      • Second Grade
  • Kids
    • Kids Crafts
    • Kids Activities
  • Projects
    • General Crafts
    • DIY
    • Sewing
    • Wreaths
  • Holidays
    • Birthdays
    • Valentine’s Day
    • Easter & Spring
    • St. Patrick’s Day
    • Mother’s Day
    • Father’s Day
    • Fourth of July
    • Halloween
    • Thanksgiving & Fall
    • Christmas
  • Recipes
    • Appetizers
    • Main Dish
    • Snacks
    • Sweets
  • Facebook
  • Pinterest
  • Instagram
  • Twitter

{Yellow & Teal Burlap Wreath}

May 24, 2013 By meredith 20 Comments

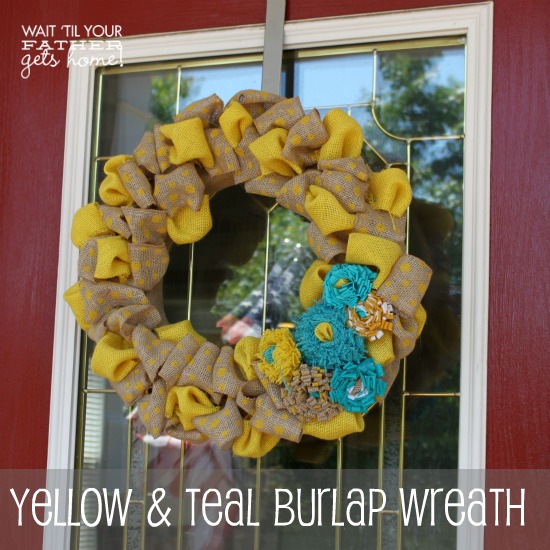
There are lots of reasons why I was so excited to make a new wreath for our front door this month.

Yellow & Teal Burlap Wreath for Summer @ Wait Til Your Father Gets Home #burlap #wreath #fabricflowers #summer

1. We got the house {and the front door} painted!  Woo hoo {finally}!!

2. I’m on baby watch and knew I needed to get something fresh and new hung up before the little one arrives {wreaths will not be a top priority for a few months}.

3. I had a stash of beautiful, colored burlap from my friends at Online Fabric Store that I’ve been itching to use.

4. My new friends at FloraCraft so generously sent me a few 16″ foam wreath forms that I could not wait to play with either!

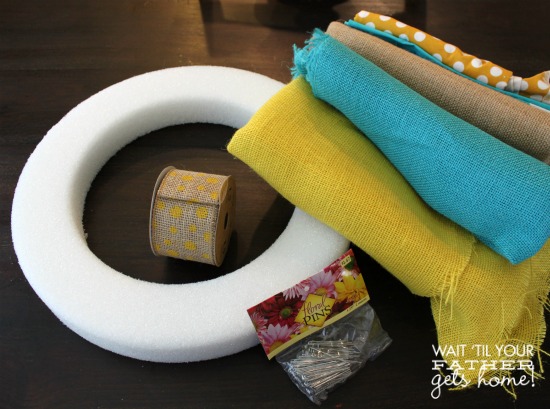
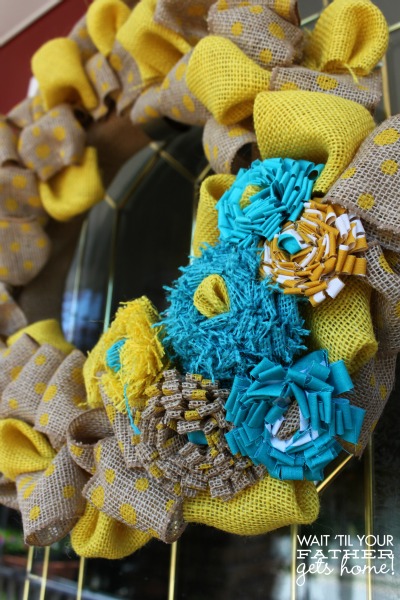
To make the wreath pictured above I used the following materials:

16″ STYROFOAM Brand Wreath Form from FloraCraft

teal, yellow, and plain burlap from Online Fabric Store {maybe 1/4 yard of each}

teal & yellow fabric from my stash {mostly purchased at Hobby Lobby}

(2) 15 ft. rolls of burlap & yellow polka dot wire ribbon {Hobby Lobby}

floral pins

hot glue gun/glue sticks
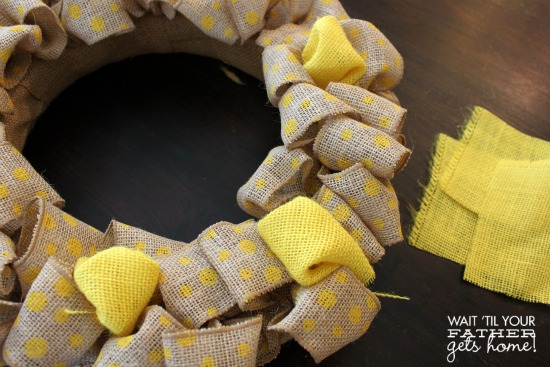
Yellow & Teal Burlap Wreath for Summer @ Wait Til Your Father Gets Home #burlap #wreath #fabricflowers #summer

Step One

Cut a strip of plain burlap to wrap around the wreath form.  That way all the white part is covered up!  Once you’ve got the form covered, start bubbling your wire ribbon and pinning in place to the wreath.  There is no perfect method to this, just do whatever feels right to you!  Each bubble should only require one pin.

Yellow & Teal Burlap Wreath for Summer @ Wait Til Your Father Gets Home #burlap #wreath #fabricflowers #summer

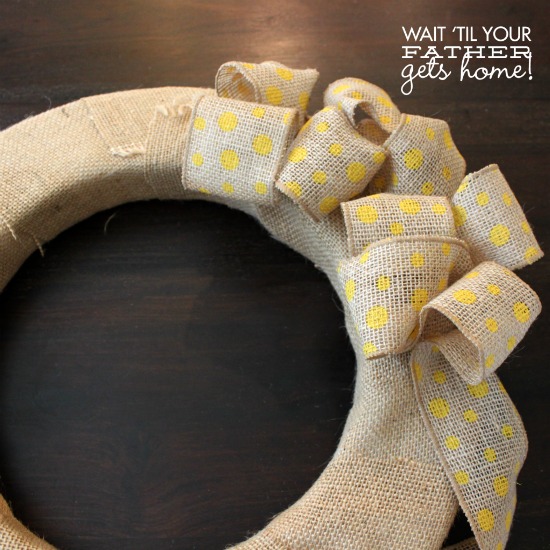
After you’ve got the entire wreath covered with the burlap & polka dot ribbon, you’re ready to start adding pops of solid yellow burlap throughout the wreath.
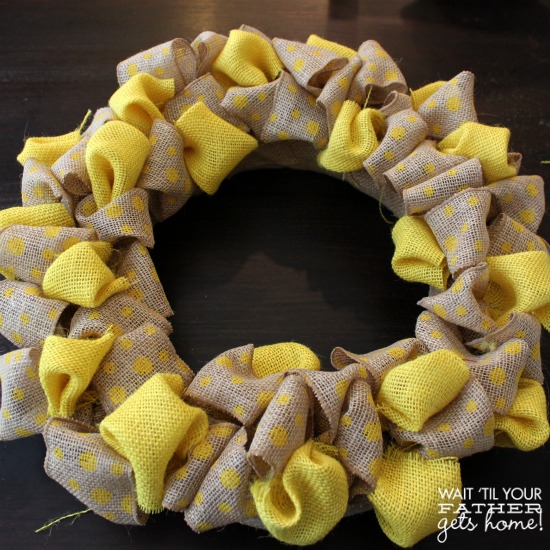
Yellow & Teal Burlap Wreath for Summer @ Wait Til Your Father Gets Home #burlap #wreath #fabricflowers #summer

Step Two

Cut a few 3 x 3 inch squares of yellow burlap.  Fold the corners in so they all meet in the middle, place a floral pin through them, and pin in place throughout the wreath.

yellow burlap

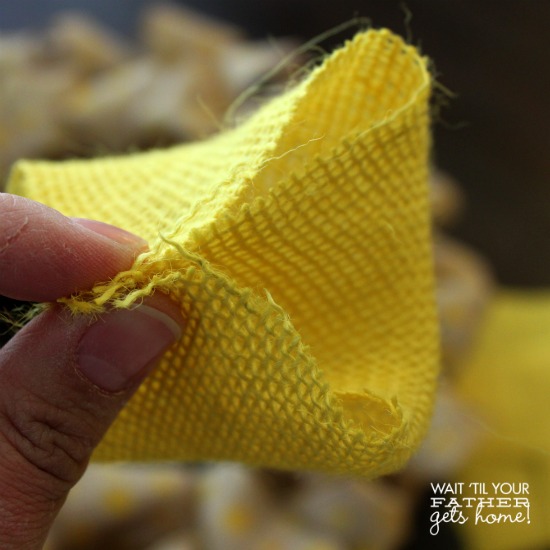
I just kept adding until I felt the wreath looked full enough and the yellow was fairly evenly dispersed.

Yellow & Teal Burlap Wreath for Summer @ Wait Til Your Father Gets Home #burlap #wreath #fabricflowers #summer

Remember, you’re working with burlap, so things aren’t going to be absolutely perfect…that’s OKAY!
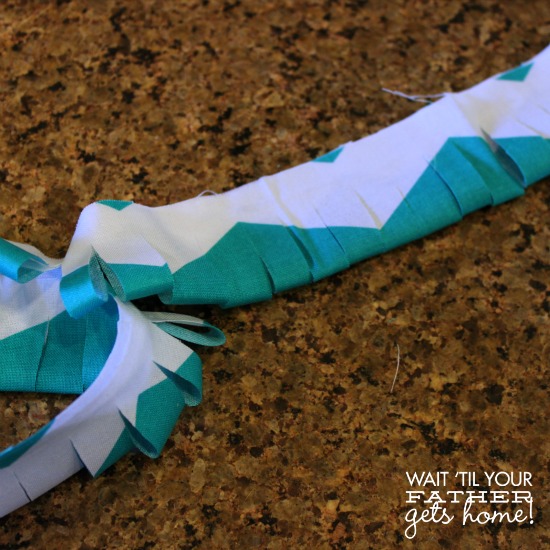
Yellow & Teal Burlap Wreath for Summer @ Wait Til Your Father Gets Home #burlap #wreath #fabricflowers #summer

Step Three

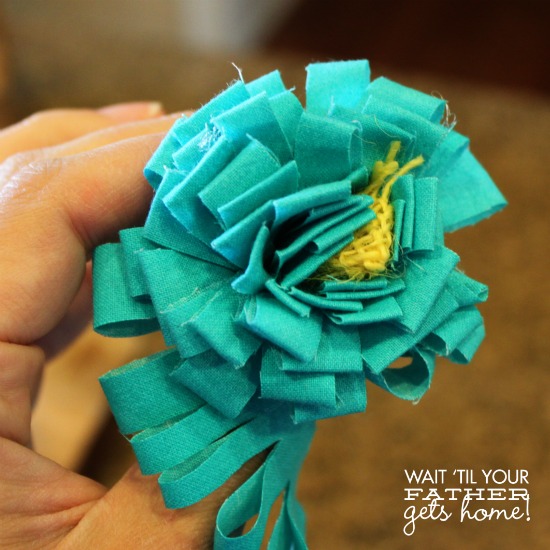
I wanted to add one more color to the wreath to really make it pop and decided to raid my fabric stash to find some great teal fabrics {all different textures and patterns}.  I knew that I wanted to add some fabric flowers to the wreath and got busy making a few.

To make my fabric flowers, I cut 4 x 25 ” strips of fabric.  Fold the fabric length-wise so that it is now 2 x 25″ and hot glue the open end shut {you could also run your sewing machine down the open end, but since this was just going outside, and I didn’t feel like breaking out my sewing machine, I simply hot glued it}.  Once the open end is glued together, cut fringe on the folded side {careful not to cut all the way through}.

prep fabric flowers

Step Four

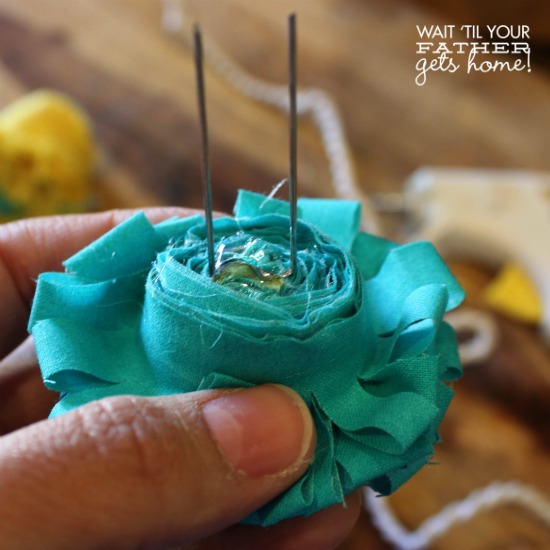
Once the fringe is cut, it’s time to start creating the actual flower.  To make the “bud” I grabbed a small piece of a contrasting fabric and began wrapping and hot gluing the fabric strip around it.

wrap and glue

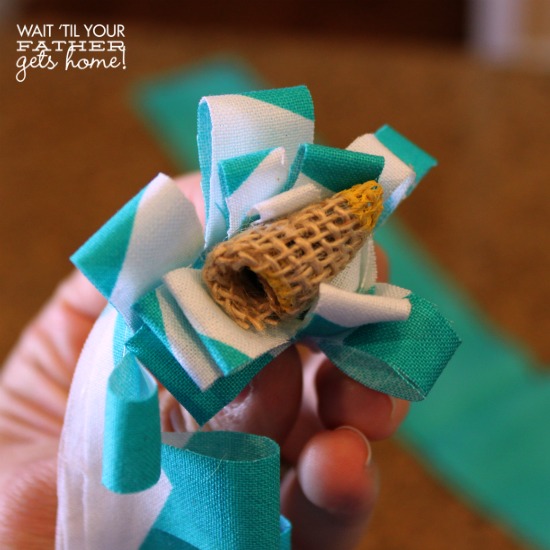
You can see that by cutting the fringe in the fabric strip, it creates the illusion of petals.

flower

Step Five

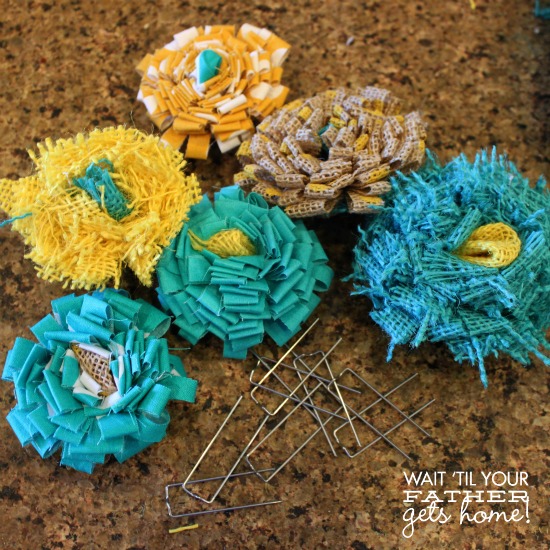
Once each flower was finished, I hot glued a floral pin to the back, so that I’d easily be able to add them to my wreath.

flower pin

And, soon, I had these beauties, ready to be added to the wreath…

Yellow & Teal Burlap Wreath for Summer @ Wait Til Your Father Gets Home #burlap #wreath #fabricflowers #summer

Step Six

I placed each flower on the wreath once I got it hung up on the door.

Yellow & Teal Burlap Wreath for Summer @ Wait Til Your Father Gets Home #burlap #wreath #fabricflowers #summer

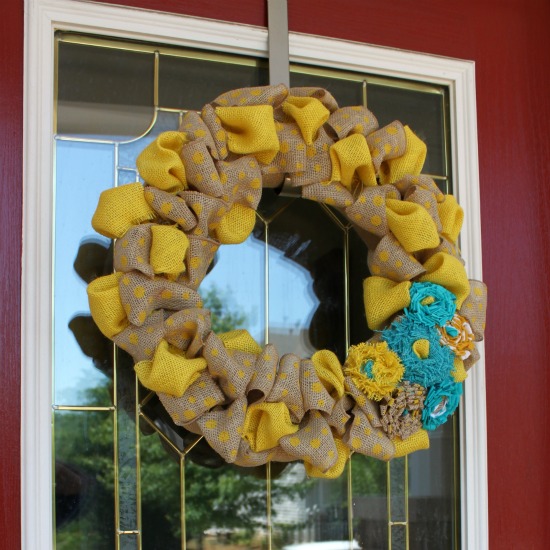
I’m loving the two colors, especially against our new red front door.  The rest of the house is painted yellow, so this yellow & teal wreath goes beautifully with our newly painted house!

Yellow & Teal Burlap Wreath for Summer @ Wait Til Your Father Gets Home #burlap #wreath #fabricflowers #summer

What have you done outside to prep for Summer?!

wtyfgh-signature

I’ll be linking up at these parties!

Related Posts Plugin for WordPress, Blogger...

Share this:

  • Facebook
  • Twitter
  • Pinterest
  • LinkedIn
  • Tumblr
  • Email

Filed Under: Crafting, Decorating, DIY, Easter & Spring, Wreaths Tagged With: burlap, fabric, fabric flowers, summer, teal, wreath, yellow

« {6 DIY Jar Ideas}
{It’s Good To Know with Country Crock} »

Comments

  1. Alli says

    May 24, 2013 at 8:13 am

    Beautiful! Love everything about it. Awesome pics! I have to make this. Hope it turns out as gorgeous as yours!

    Reply
    • meredith says

      May 24, 2013 at 4:33 pm

      Thanks so much! So glad you liked it 🙂 Have fun making yours!!

      Reply
  2. Kirsten @ One Tough Mother says

    May 24, 2013 at 8:28 am

    Girl, this is FABULOUS!! I love the colors you chose. So pretty!

    Reply
  3. Cheryl @ That's What Che Said... says

    May 24, 2013 at 10:55 am

    There are those gorgeous flowers I spied on Instagram! Love it lady! Hope you are feeling good!

    Reply
    • meredith says

      May 24, 2013 at 4:33 pm

      Thanks girl!

      Reply
  4. Jennifer says

    May 24, 2013 at 1:03 pm

    Adorable! Pinning to me Wreath board 🙂

    Reply
  5. Sharon says

    May 24, 2013 at 1:46 pm

    I love, love your wreath Meredith! Pinned and tweeted and will share on Facebook this weekend. (Polka dot burlap ribbon? Yummy!) Thank you!

    Reply
    • meredith says

      May 24, 2013 at 4:32 pm

      Thanks so much Sharon! So glad you liked the wreath…the polka dot burlap might be my new favorite thing!

      Reply
  6. Lori @ A Bright and Beautiful Life says

    May 24, 2013 at 2:03 pm

    I adore your wreath.

    Reply
    • meredith says

      May 24, 2013 at 4:32 pm

      Thanks so much!!

      Reply
  7. Rhondda Mol says

    May 24, 2013 at 6:10 pm

    That is one stunning wreath! Thank you for the fabulous tutorial –
    🙂
    Rhondda,
    Oombawka Design

    Reply
  8. Kara says

    May 26, 2013 at 11:29 am

    Awesome! Those those teal flowers!

    Reply
  9. Justine Y says

    May 30, 2013 at 11:51 am

    This is so awesome! I have a bunch of leftover burlap so I’ll have to give this a try, thanks!

    Reply
    • meredith says

      May 30, 2013 at 1:36 pm

      Thanks! Have fun 🙂

      Reply
  10. Krista @thehappyhousie says

    June 1, 2013 at 12:10 am

    So cute Meredith!! I love the yellow and teal together and they look great with the burlap. Thanks for the tutorial!
    Krista

    Reply
    • meredith says

      June 1, 2013 at 10:21 am

      Absolutely! Thanks for stopping by 🙂

      Reply
  11. Emily says

    June 4, 2013 at 6:32 pm

    So pretty! Love the colors!

    I’ve pinned and shared today on my blog: http://www.52mantels.com/2013/06/summer-food-crafts.html

    Reply
  12. Latorra says

    July 2, 2013 at 7:00 pm

    Thanks for the inspiration and guidance! Used this design but changed the colors to red and blue for a patriotic flare!

    Reply
    • meredith says

      July 3, 2013 at 3:50 pm

      GREAT idea!!

      Reply

Trackbacks

  1. 30+ Fabulous Fall Wreaths says:
    September 2, 2013 at 6:02 am

    […] Wait Til Your Father Gets Home […]

    Reply

Leave a Reply Cancel reply

Your email address will not be published. Required fields are marked *

This site uses Akismet to reduce spam. Learn how your comment data is processed.

Get Posts Via Email

Timberdoodle

Featured Posts

Get 1 Year for $45 - 62% off!
All About Reading Activity Bundle

Follow On Facebook

Affiliates

Archives

Copyright

YOU ARE WELCOME TO LINK TO THIS SITE AND USE A SINGLE IMAGE TO LINK BACK TO ANY DIRECT POST. ALL BORROWED CONTENT MUST BE LINKED BACK AND PROPERLY CREDITED. USING PHOTOS OF MY CHILDREN AND FAMILY IS OFF LIMITS! DO NOT USE THESE ON YOUR SITE WITHOUT PERMISSION. DO NOT REPUBLISH ONE OF MY POSTS IN WHOLE OR IN PART AS THIS STRICTLY PROHIBITED WITHOUT THE PROPER PERMISSIONS. PLEASE DON'T HESITATE TO CONTACT ME! THANK YOU!

[footer_backtotop]

Copyright © 2025 · Blog Design by Key Lime Digital Designs · Genesis Framework by StudioPress · WordPress · Log in