I’m happy to announce the official start of the…

…School’s {in} Session Series @ Wait ‘Til Your Father Gets Home!
Over the next two weeks I’ve got twelve amazing bloggers that are eager to share some awesome back to school crafts, projects, recipes, tips & tricks!
I’ve also got a HUGE GIVEAWAY for YOU, my fantastic readers to celebrate this fun time of year! Come back TODAY around 7 PM to enter to win gift cards, handmade items (perfect for back to school) from several great Etsy shops, free ad space, and a couple of beautiful jewelry pieces as well! It’s going to be BIG! I can’t wait to introduce you to all the lovely ladies that made the giveaway possible…I know you’ll LOVE them!
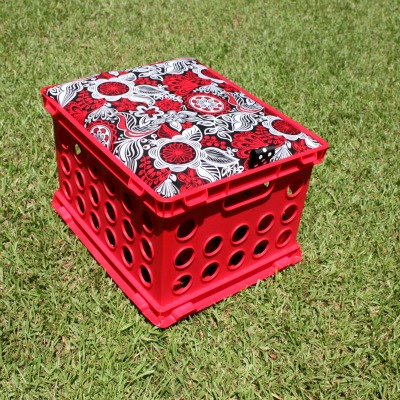
To kick things off today, I wanted to share a super cute storage/decor idea for any elementary classroom, home school room, playroom, reading corner, or kids bedroom!

To make a {fabric covered crate seat} you’ll need:
milk crates (we used 4 for this project)
3 yards fabric (22 x 24 inches)
twin mattress pad (you can find these super cheap at Target or WalMart)
coordinating ribbon (four 10 inch pieces)
particle board or MDF (you need 4 pieces to fit your crate; ours were 12.75 x 15 11/16 inch rectangles)
staple gun

I helped a good friend make a set of these seats for her 2nd grade classroom, but I’ve already got plans to make a couple more to go in my little guy’s reading corner soon as well! Since neither my friend or myself had absolutely any experience using a table saw, her hubby helped us out by measuring and cutting the particle board for us! If we had actually had to do that part, this project probably would have taken us all day! I know, I know…I need to learn to use tools…does a screwdriver count?!
To start, lay out the foam mattress pad and use the cut piece of particle board as a guide. Cut the foam as close to the size of the board as you can. You could use two layers of foam per board if you want the seats to be extra soft. We felt that the one layer was just fine though!
Next, you’ll need to cut the fabric pieces. The measurements listed above for the fabric are very generous. To cut each piece we simply laid out the fabric underneath the cut board and cut. Just make sure to leave enough of a border of the fabric that you can fold it tightly over the foam pad and the board and staple it securely.

Now you’re ready to fold and staple. You should have the fabric, wrong side facing up, first, then the foam, and finally the particle board. Make nice, tight folds and staple with a staple gun in place.

Fold the corners like you would a present. You may need a few extra staples to ensure that everything is secure!

Once the fabric is completely secured on all sides, you’re ready to attach the ribbon. This will serve as a ribbon pull to lift the seat part off the crate, so you can store items in the crate itself. We put the ribbon pull on the short side of the seat after measuring to find the middle. Use a 10 inch piece folded in half. You may also want to use a lighter on the ends to keep the ribbon from fraying over time.

Now, all you have left to do is pop the seat on top of the crate!

These are perfect for little bodies to sit on and enjoy a good book! The nice thing about them is you can make them in any color imaginable, so they will fit your room decor/theme perfectly! I also LOVE the fact that they are multi-purpose: a seat and a book storage item in one!
My friend ended up making a set of four to use in her listening center in her classroom.

Remember, come back around 7 PM EST this evening to meet the School’s {in} Session Giveaway Donors and all of the awesome prizes that one lucky winner will receive! This contest is only open to U.S. residents. I’m hoping to have giveaways in the future open to U.S. and Canada residents, so stay tuned! AND, check back each day over the next two weeks for some amazing back to school ideas!
Enjoy!

Please leave a comment, I love to hear from my readers!
I’ll be linking up at these great parties!


Meredith, I ADORE these! Do you have any idea where you can get a hold of milk crates if you don’t have the school hook-up? 🙂
You can get them at Walmart. If you live in a college town then they are in abundance during July and August! 🙂
Yes! I bet they’ll start stocking up for back to school by the end of the month too! 🙂
Saw these on Pinterest ages ago and wanted to make them. Those turned out adorable! Love the fabric!
This is such an awesome idea!
These would be perfect for our playroom!! What a great idea and the colors are wonderful. I gotta find some crates!
I LOVE these seats!! I wanted to comment on your School’s In Session Giveaway, but there is no comment section?! I think the prizes are GREAT, but I have to admit I am MOST excited at the thought of winning the Target giftcard. 🙂
Thanks so much! Hmm…I’m trying to figure out why there isn’t a comment section on the other post! Thanks for letting me know 🙂
Comments are back up on the other post now! Thanks again for letting me know!
what a cute idea – and i love that you don’t need to sew (since i can’t) 🙂
It’s the perfect project for those non-sewers out there!!
That is the coolest seating! Very clever and I love the fabric as well! Nice project!
Thank you! I’m so glad you liked it 🙂
Wow! What a fantastic idea! I don’t sew either, so this is right up my alley!! 🙂
So glad you liked them 🙂
Now this is fabulous! Love the fabric…such a cute idea and cheap and easy. Come link up to Centerpiece Wednesday and share your idea! I need to make some for my grandkids!!
Karin
Thank you so much! Heading over to link up with y’all now 🙂
I absolutely love this idea for hidden storage too! Needed something just like this for my daughter’s room, thanks! 🙂
What a great idea!! I need to make some of these for my classroom. They are so cute! Can’t wait to see more. Thanks for sharing. 🙂
These are adorable! What a cute addition to a play room. I can’t sew either, so I can’t wait to give this craft a try. Pinning!!
I’m so glad you like them 🙂
Meredith, you are a GENIUS!!! WOW!! What a great seat!! LOVE IT!
Thanks so much for sharing this at The DIY Dreamer… From Dream To Reality!
What a great idea! These would be wonderful for a kid’s room or a dorm room or a Sunday school room–I can imagine lots of uses! Those crates are very sturdy; I’m sure they work really well. Thanks for sharing your inspiration!
These are adorable! Fabulous tutorial. Thank you for linking up to Uncommon! Featuring these on our FB page! 🙂
Thanks for the feature 🙂
Great project idea & looks fantastic. Thanks for linking to Craftastic Monday at Sew Can Do:)
Thank you so much! Glad you stopped by!!
This would be perfect for my preschool classroom. What a great idea!
You’re so welcome! Thanks for stopping by!
Merideth, this is a genius idea! Love the fabric you chose, too. Cute, cute, cute… pinning!
<3 Christina at I Gotta Create!
Wildly Original linky party is open.
Thanks Christina! So glad you liked it!
This is awesome, Meredith! It turned out great. I love the pattern and the red! Thank you so much for sharing at my Throwback Thursday party. I’m so happy you stopped by and hope you’ll come by again this week!
P.S. I LOVE your blog name… too cute!
Thanks Britni! Glad to join you this week 🙂
I love this seat. It is such a great storage solution! I have featured you with this week’s Blog Stalking Thursday! I would love for you to stop by and grab a Featured Button. Wear it proudly, you deserve it! Thanks again
Aww, thanks Katie! I’m so excited to be featured 🙂
These are darling Meredith!! Such a creative way to make a seat! I love the colors you chose. Thank you so much for sharing at Thursday’s Temptation. I am featuring you fun seats at todays link party!
http://twoyellowbirdsdecor.blogspot.com/2012/08/thursdays-temptation-31-fabulous.html
Jill
Thanks Jill! I love linking up at your party…I’m honored 🙂
I absolutely love this! I’m new to your site. I hope you will link this up at One Creative Weekend at OneCreativeMommy.com. I can’t wait to make some of these. Thanks for the inspiration. (I have seen this before, but never with a tutorial.) (pinning and following you.)
Hey Heidi! I’m so glad you found my blog 🙂 Thanks for your sweet comments…heading over to check out your blog now and follow back!
I’m so glad you linked this up at One Creative Weekend! I love it! Hope your weekend is fantastic.
I featured your idea on One Creative Weekend at OneCreativeMommy.com this week. Please stop by and grab a featured button if you’d like. I can’t wait to see what you link up this week!
Thanks! I’m so excited 🙂
This is adorable.. have a lot of these in garage.. now you got me wanting to get these done right away.. Thank you for sharing this wonderful idea
You are so welcome! Enjoy making them…it’s fun 🙂
This is so clever and cute. Happy you linked up at Looksi! Come back soon 🙂 ~ Julie Looksi Ambassador
Thank you so much! I’m excited to start submitting lots of projects 😉
Just gave you a shout out..Happy National Craft Month!
http://4you-withlove.blogspot.com/2013/03/march-is-national-craft-month.html
You ROCK! Thanks girl 🙂
This is such a great idea and project! I love that you can make it any material design you want. The kids will surely love it and I know people will ask where I bought it lol Thank you for sharing.
These are great! Do you remember if the crates were the sterrilite crates? It would be great if I could use your measurements! Thank you!
Hi! Thank you so much for including the dimensions. That saves so much time. I teach 5th, do you think these would be too small? What do you think the weight limit is? I want to put some cute seats in my reading area.
Thanks again,
Celeste
I think if they are in your reading area and perhaps even around a reading table, the kids would love them! I think they should be just fine for a 5th grader, unless you’ve got some super tall kiddos!! 🙂
Hi Meredith,
Just was wondering where you purchased the crates? My dad is helping me with this project for my Kindergarten classroom and the crates I purchased from Target have uneven ledges inside which would interfere with the wood.
Thanks!
I think I found them at Walmart.
How durable are they? I teach Kinder and would love these for a comfy center choice instead of the rug! I just want to make sure the kids wouldn’t break them.
I would imagine with kindergarten they should be pretty durable {able to hold them}.
I made these for my second grade classroom and LOVE them!! They save so much room around my reading table! I have the same difficulty with tools. If you take your crate to Home Depot they will cut the board to fit your crate at no extra charge!!! Loved this!!!! Warning: If you buy crates from Wal-Mart and Target, the boards will not fit both. There is just a little bit of difference in the size of the crates. Learned this the hard way. I recommend these highly for any classroom.
Hi there!
I love these! I’m making them for my classroom but I am having trouble finding the foam??? The only foam mattress padding available at Target was $70+ and since you said super cheap I didn’t think that was what you meant. Any ideas??
Thanks
Jenny
I got an egg shell mattress topper at Walmart. I’m positive it was less than $12!!
Now that you have had these for a few years, how are they holding up? I want to make these for my classroom, but my husband is REALLY worried about the seats falling into the crates. Have you experienced this?
Thank you for your help, and for the great tutorial as well.
🙂 Jacoba
They are currently in a friend’s classroom and have held up beautifully. They were with 2nd graders, 1st graders, and now this year Kindergarteners!
We are going to make these for our kids for camping, think it would be great to store books, crayons etc and use to sit around campfire….
Question: how does the wood not fall into the crate? How does it keep from sliding all the way in?
There is usually a lip on the crates (where hanging folders would go), that keeps the wood from falling in! Enjoy making them, they turn out so cute!!
I’m very interested in making these for my classroom! Do you happen to know if lowes or Home Depot will cut the particle board?
I’m pretty sure either store offers that service as long as you’re buying the wood there! Have fun making them!
I first made these with black Sterlite crates and they have a lip on all four sides. I bought 4 white ones and they only have a lip on 2 sides. I can’t find color ones with lips on all four sides. Are they just as sturdy as the black ones. I am using them in a nursery and don’t want black or to paint them. Anybody else have this problem. Thank youi