Wait Til Your Father Gets Home

Just a bit of all the little bits of life at home!

  • Home
    • About
      • Homeschool Necessities
      • Homeschool Books
      • Meet Meredith
      • Disclosure
      • Advertise
  • Podcast
    • Radical Podcast
  • Homeschool
    • Homeschool Organization
    • Book Lists
    • Sight Words
    • Curriculum
      • Preschool
      • Pre-K
      • Kindergarten
      • First Grade
      • Second Grade
  • Kids
    • Kids Crafts
    • Kids Activities
  • Projects
    • General Crafts
    • DIY
    • Sewing
    • Wreaths
  • Holidays
    • Birthdays
    • Valentine’s Day
    • Easter & Spring
    • St. Patrick’s Day
    • Mother’s Day
    • Father’s Day
    • Fourth of July
    • Halloween
    • Thanksgiving & Fall
    • Christmas
  • Recipes
    • Appetizers
    • Main Dish
    • Snacks
    • Sweets
  • Facebook
  • Pinterest
  • Instagram
  • Twitter

Torn Fabric Birthday Banner

June 19, 2014 By meredith 7 Comments

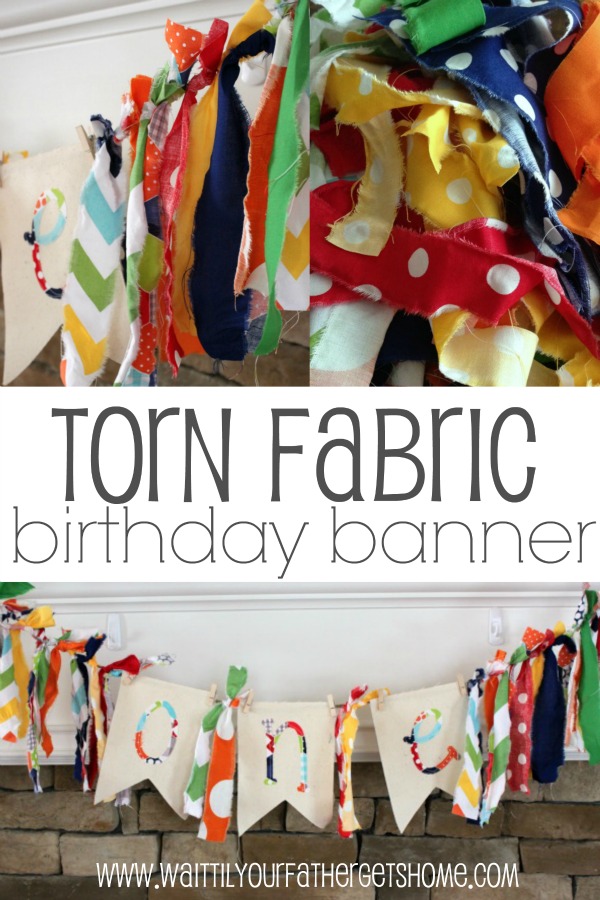
My littlest boy just had a big birthday a few weeks ago.  He turned 1 {and I still can’t believe it}!  We celebrated with a bright and colorful monster themed birthday party.  I’m so excited to share all the little details with you all over the coming month and decided to start today with one of my favorite DIY’s from the day, his birthday banner.

Make a torn fabric birthday banner for your child's next birthday party via www.waittilyourfathergetshome.com #birthday #banner #fabric #party #decor

Making the banner was so super easy and fun.  Tearing the fabric might have been my favorite part!  To make a torn fabric banner you’ll need:

several fat quarters of colorful fabric

canvas pennant flags

Heat & Bond

{affiliate link} Cricut Explore™

mini clothespins

jute twine

iron/ironing board

To begin, I cut the letters from this colorful hexagon print from The Ribbon Retreat.

Make a torn fabric birthday banner for your child's next birthday party via www.waittilyourfathergetshome.com #birthday #banner #fabric #party #decor

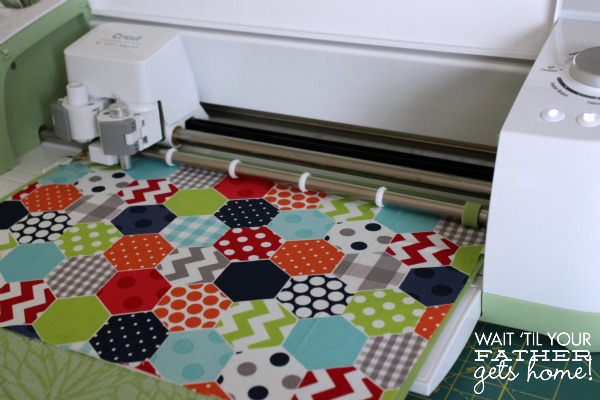
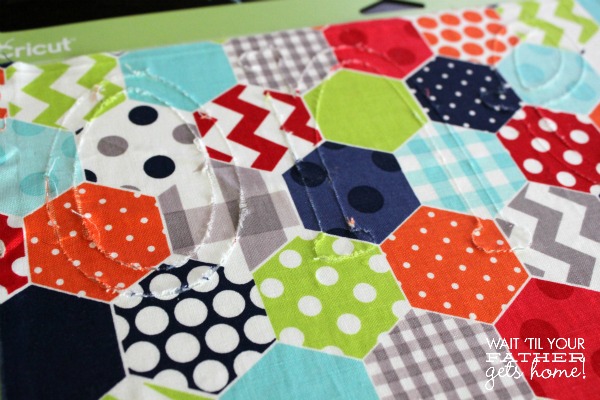
If you’ve never cut fabric on a cutting machine before, it’s so easy.  Simply follow package instructions for adhering Heavy Duty Heat & Bond to your piece of fabric.  Since the Explore has the easy to use Smart Set Dial, all you have to do is turn it to fabric and it knows exactly how it should be cut.

Make a torn fabric birthday banner for your child's next birthday party via www.waittilyourfathergetshome.com #birthday #banner #fabric #party #decor

I used a free font that I downloaded called Miss Smarty Pants for the letters.  I ended up using it for a lot of the party decor actually!

Once the letters were cut, I removed the paper backing of the Heat & Bond and ironed them to three separate canvas pennant flags and then began making the banner itself.

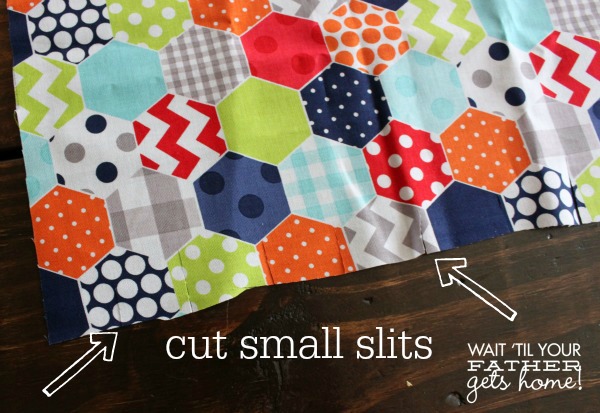
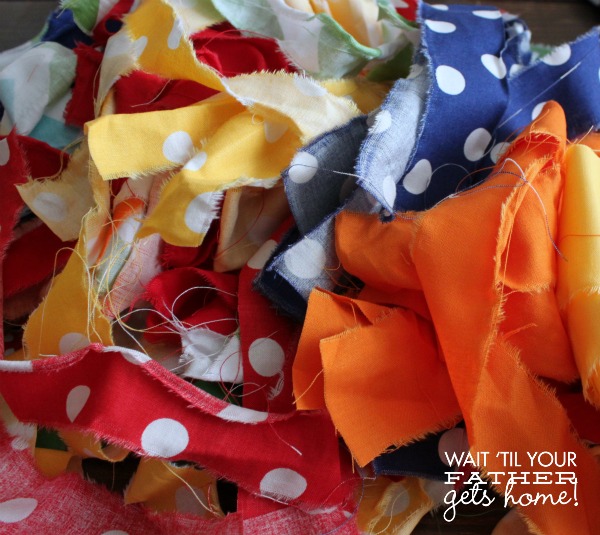
First, I had some fabric to tear {and this part was so EASY and kinda fun}.  To tear fabric, you simply cut small slits with your fabric scissors at the bottom of your piece of fabric.  Once the slits are all cut, begin to tear the fabric {and it will tear in a straight line, trust me}.

Make a torn fabric birthday banner for your child's next birthday party via www.waittilyourfathergetshome.com #birthday #banner #fabric #party #decor

I soon had a pile of torn fabric to work with {and ended up using this torn fabric for a few other birthday related projects as well.}

Make a torn fabric birthday banner for your child's next birthday party via www.waittilyourfathergetshome.com #birthday #banner #fabric #party #decor

To assemble my banner, I used mini clothespins to attach the canvas pennants to a piece of jute twine, then filled in between the pennants and on either side with the torn fabric.  I simply tied a double knot for each piece.

Make a torn fabric birthday banner for your child's next birthday party via www.waittilyourfathergetshome.com #birthday #banner #fabric #party #decor

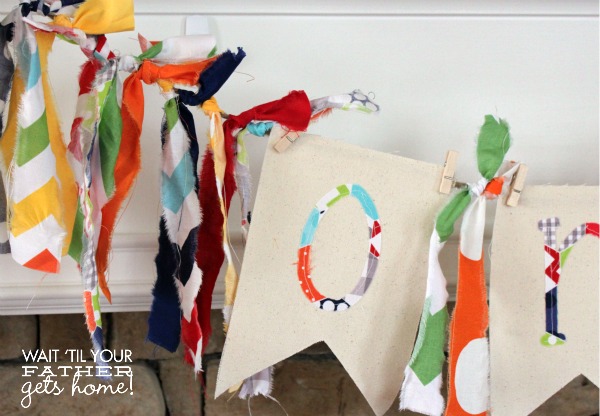
I like the shabby chic-ness of the torn fabric.

Make a torn fabric birthday banner for your child's next birthday party via www.waittilyourfathergetshome.com #birthday #banner #fabric #party #decor

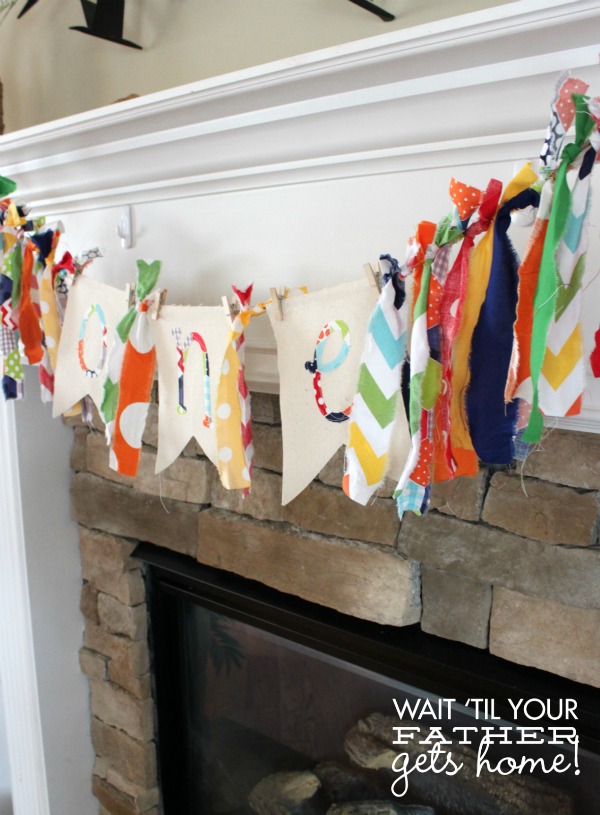
It was perfect to hang on our mantel for the party!  Stay tuned for more first birthday party decor ideas!

wtyfgh-signature

Related Posts Plugin for WordPress, Blogger...

Share this:

  • Facebook
  • Twitter
  • Pinterest
  • LinkedIn
  • Tumblr
  • Email

Filed Under: Birthdays, Crafting, Cricut Tagged With: 1st birthday, banner, birthday, birthday banner, cricut, Cricut Explore, fabric, fabric banner, monster theme

« Ulta Gift Card Giveaway
5 Steps to Super Mom Status »

Comments

  1. Allyssa S says

    June 19, 2014 at 9:18 am

    That is so cute! great for leftover fabric scraps. I think I’ll be doing this next month for my sons 2nd birthday! Thank you

    Reply
    • meredith says

      June 19, 2014 at 4:20 pm

      So glad you liked it! Thanks for stopping by and have fun creating 🙂

      Reply
  2. Stephanie says

    June 21, 2014 at 7:22 am

    pretty neat idea! my daughters birthday is in jan might try this

    Reply
  3. Fiona says

    July 1, 2014 at 1:40 pm

    This is super cute, great idea 🙂

    Reply
    • meredith says

      July 1, 2014 at 8:59 pm

      Thank you so much!! It was one of my favorite parts of the party for sure 🙂

      Reply

Trackbacks

  1. Monster Eye Mobile - Wait Til Your Father Gets Home says:
    June 23, 2014 at 6:00 am

    […]  Last week I shared one of my favorite projects from the Monster Themed 1st Birthday Party, this Torn Fabric Birthday Banner.  Today, I’ve got another fun and inexpensive idea, a Monster Eye […]

    Reply
  2. Monster Eye Birthday Celebration Wreath - Wait Til Your Father Gets Home says:
    July 23, 2014 at 12:12 am

    […] Torn Fabric Birthday Banner […]

    Reply

Leave a Reply Cancel reply

Your email address will not be published. Required fields are marked *

This site uses Akismet to reduce spam. Learn how your comment data is processed.

Get Posts Via Email

Timberdoodle

Featured Posts

Get 1 Year for $45 - 62% off!
All About Reading Activity Bundle

Follow On Facebook

Affiliates

Archives

Copyright

YOU ARE WELCOME TO LINK TO THIS SITE AND USE A SINGLE IMAGE TO LINK BACK TO ANY DIRECT POST. ALL BORROWED CONTENT MUST BE LINKED BACK AND PROPERLY CREDITED. USING PHOTOS OF MY CHILDREN AND FAMILY IS OFF LIMITS! DO NOT USE THESE ON YOUR SITE WITHOUT PERMISSION. DO NOT REPUBLISH ONE OF MY POSTS IN WHOLE OR IN PART AS THIS STRICTLY PROHIBITED WITHOUT THE PROPER PERMISSIONS. PLEASE DON'T HESITATE TO CONTACT ME! THANK YOU!

[footer_backtotop]

Copyright © 2025 · Blog Design by Key Lime Digital Designs · Genesis Framework by StudioPress · WordPress · Log in